
You are done with launching a new website. Congratulation for your presence on world wide web. You will be so excited with your new website. You have chosen WordPress one of the best CMS. WordPress is the one of best Content Management System among all the available. It is open source which uses PHP as code base and MySQL as database. This days Mariadb is even an option to the MySQL.WordPress is providing easiest interface or the GUI to interact with the user. It is highly scalable and giving lots of themes and plugin. This is the reason why WordPress is best choice among the bloggers and developers.
A lot of plugins are available in WordPress respiratory which makes our task easier. This plugins makes us to enhance the desired features and functionality of the blog as per our requirement.
There are lots of themes on the basis of our traffic you can change your theme whenever you want to change. it is a s advice to select theme as per your topic.
We have already set up the WordPress there are few precautions that we should take care of. In order to perform the precautions we need to take some necessary just after the setup of the WordPress website. If you are not considering this then there will be no problem but there will be some loopholes for the hackers.
If you have done with WordPress website setup and thinking what next then this is the right article to read and follow.
#1. Disable User Registration
If you are creating a blog or a simple website which is managed by you, then you don’t need extra users. In such case we have to disable the user registration because it can provide security bleach to hackers. If you want user than you just create and give the login details to end user.
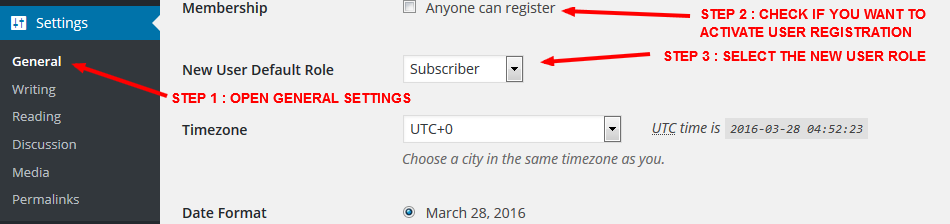
For disabling user registration just go to Dashboard » Settings » General, here you can find the registration check box just check it to disable the user registration. By default the user registration is disabled.
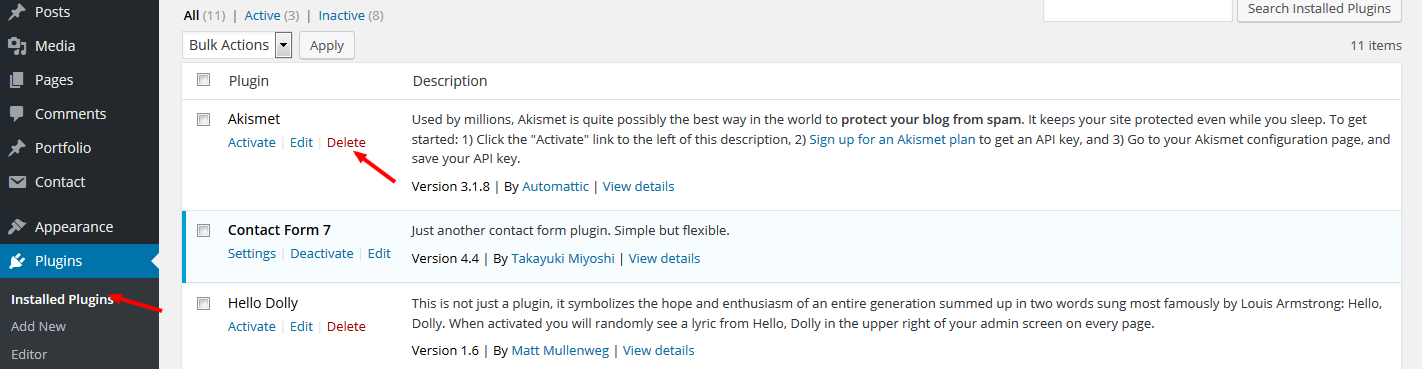
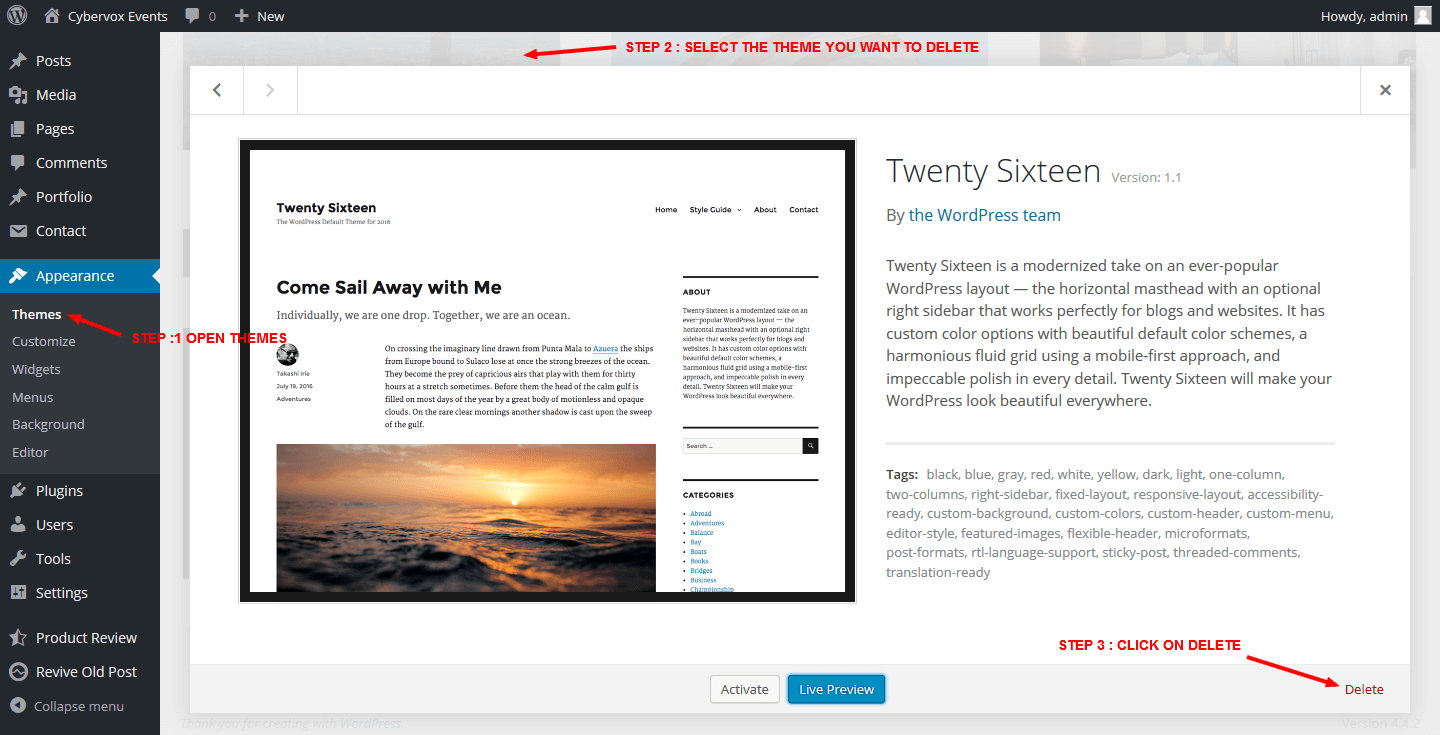
#2. Delete the Themes And Plugins which are not required.
Don’t keep the theme or plugin which you are not interested to use or inactive and having no further use. Few of them are pre installed like Akismet, hello dolly, twenty sixteen, twenty fifteen. It will help to little executable code.
To Delete plugin go to Dashboard » Plugins » Installed plugins. And click on remove.
To delete theme go to Dashboard » Appearance » Themes, and remove unused themes
#3. Delete the Default Content generated by WordPress
WordPress add some dummy data in order to show the sample, At the beginning it creates a hello world post, A WordPress comment on it and a sample page in pages. This are the top places where spam comments can take place or the other activity can be done. This are not required by us hence it should be deleted manually.
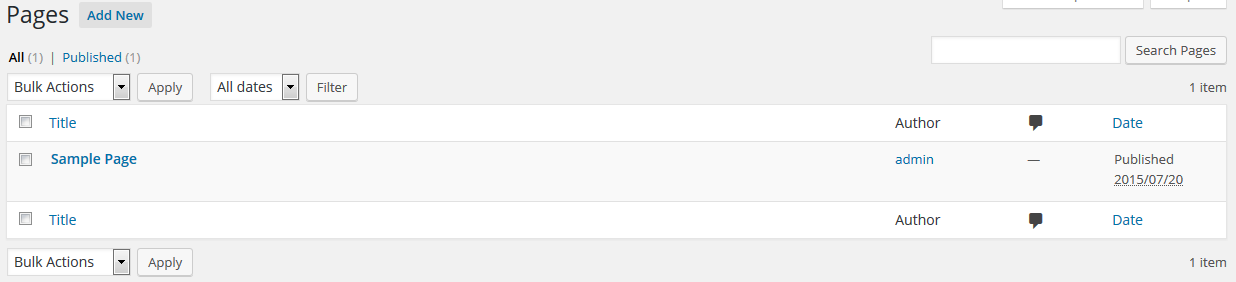
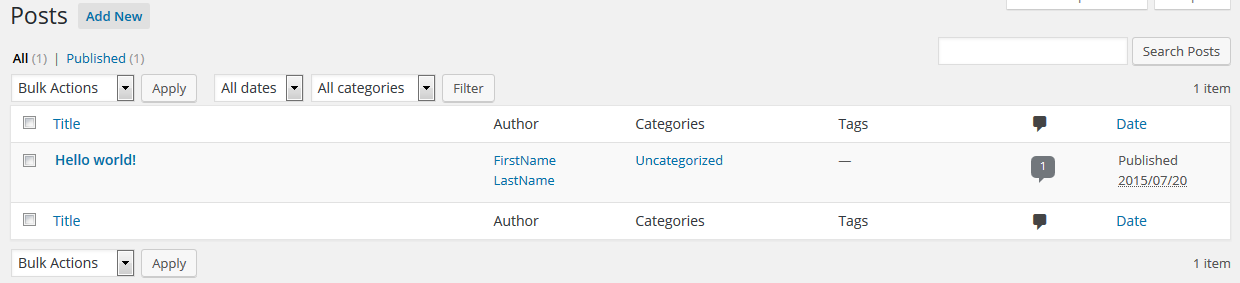

Just go to the Dashboard » Posts, Dashboard » Pages, Dashboard » Comments and Dashboard » Appearance » Widgets and delete all WordPress generated contents which are not related to your website.
#4. Add Favicon and Other Icons to the Website
As we are running some business or branding purpose website favicon, Logo and other Icons are very important to us as they reflect our Organization. Its just easy step to perform, Logo can be set using your theme, this days themes are also providing build in capability to add the favicon and other icons.
Browsers and the feed readers always request favicon or apple touch icons from your server. So you have to add these set of icons to avoid 404 not found error.
So, upload the created favicon.ico and apple-touch.png to the home/root directory of your blog. Then add below line to your .htaccess to redirect all apple touch icon requests to that particular file.
RedirectMatch 301 /apple-touch-icon(.*)?.png http://www.example.com/apple-touch.png
This is 301 redirect to our icon set this will work only for the iPhone and iPad. Other favicon can be set using the theme.
#5. Set Your Time Zone
We need localization as the WordPress by default set the time to the GMT (UTC +0) and in the worpress above 4.3 it offers the country selection option to select the timezone. This will help you to perform some cron job or schedule your post.
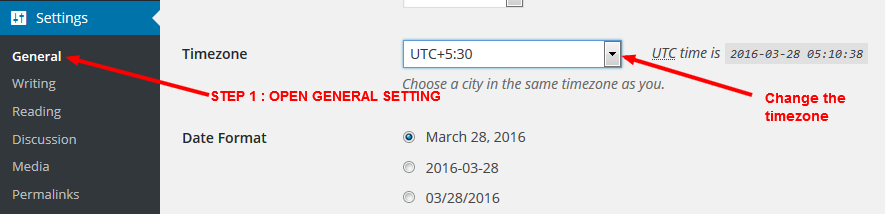
To set the timezone just to go to Dashboard » Settings » General. and Select from the given option of timezone.
#6. Change WordPress Permalink structure
Permalink or say URL structure are playing important role in Search Engine Optimization. As per the SEO rule permalink should contain the main focus keyword. By default it will show Plain format means with ids we need to change it to the post name.
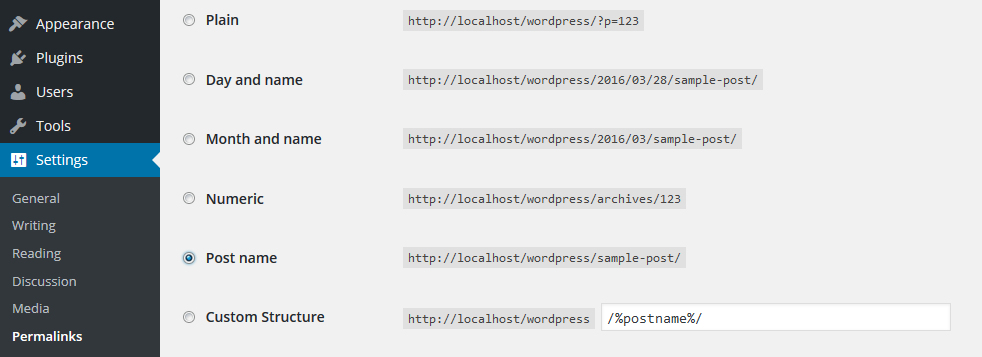
To change Permalink Structure go to Dashboard » Setting » Permalinks. You will see few Options, select Post name from the given option.
#7. If you have created user account with “admin” then change it
If you kept the user account as admin then spammers will love you. As they know the default username, it may be vulnerable. So its recommend to change your user name to something else.
- We need to create a new user, For creating new user go to Users » Your Profile
- Now its time to create a new username with administrator role. Give the user name of your choice and assign role of an “Administrator”.

- Now time to login using new user credentials, just log out from your current user account.
- Log in with new user credentials and DELETE the admin user name. If you have made some pages/posts, choose the user from the option to transfer that posts to your new username.

#8. Disallow Indexing of WordPress directory
We really don’t need to index our whole website in the Search engine, Means we do not need to get all data crawled, We need to hide such files from the search results. So you need to put some code to the robots.txt of the root directory.
User-agent: *
Disallow: /wp-admin/
Disallow: /wp-includes/
Disallow: /wp-content/plugins/
Disallow: /wp-content/themes/
NOTE : We should allow the feed to get crawled, on that basis some search engines and website track your updates
#9. Stop Indexing XML Files
All website must have a sitemap to tell search engines about your pages available on your site else that will not get discovered, moreover, I can tell that there is no reason to show sitemap itself in the SERPs, As the sitemap.xml is not a page where people are visiting it’s visitors are only bots so we can hide it.
By adding the code below in to your .htaccess file in WordPress root directory you can stop XML sitemap indexing.
<IfModule mod_rewrite.c>
<Files sitemap.xml>
Header set X-Robots-Tag “noindex”
</Files>
</IfModule>
#10. Turn off or Limit Post Revisions in WordPress
Revision is a great feature of the WordPress that store the post history when any changes are performed to any post or page, So sometime if you are having trouble than you can restore the previous version of the Post immediately. But this create litter extra burden on the MySQL, which may leads to slow down of the website.
So it is good to disable it but not advised, just go to the ftp account or use some plugin and open the wp-config.php file and add the lines below:
define( ‘WP_POST_REVISIONS’, false);
Even you can limit the number of the revision, instead of above code you have to add below line to the wp-config.php file:
if you want to save last 5 revision than code would be as below,
define( ‘WP_POST_REVISIONS’, 5);
#11. Remove unnecessary meta tags from WordPress header
If you check your WordPress website’s HTML code, you will find some meta tags in the header of your website which are useless. One of them is meta tag of the generator who shows the WordPress version.
<meta name=”generator” content=”WordPress 4.1″ />
This is of no use. At the other hand the hacker will knowing the bug of a particular version, so we make easy for them to hack our website, Hence it is advised to hide such information from your HTML file.
To do so just add below lines in your function.php file.
// To remove index link
remove_action( ‘wp_head’, ‘index_rel_link’ );

// to remove previous link
remove_action( ‘wp_head’, ‘parent_post_rel_link’, 10, 0 );

// This will Display relational links for the posts adjacent to the current post.
remove_action( ‘wp_head’, ‘adjacent_posts_rel_link’, 10, 0 );

// To remove the generator meta tag
remove_action( ‘wp_head’, ‘wp_generator’ ) ;

// To remove the link to the Windows Live Writer manifest file.
remove_action( ‘wp_head’, ‘wlwmanifest_link’ ) ;

// To remove the link to the Really Simple Discovery service endpoint or pingback
remove_action( ‘wp_head’, ‘rsd_link’ ) ;

// To Remove the links to the extra feeds such as category feeds
remove_action( ‘wp_head’, ‘feed_links_extra’, 3 );
#12. Use Contend Delivery Network for media files
By default WordPress use to uploads all media in wp-content/uploads directory. If will be great if we are storing media somewhere else. Like, you can create a subdomain, i.e. images.example.com/files.
You must be wondering that what will be benefit of using CDN?
If you are using this method than it will show a huge impact on the loading speed of the website as it will consider subdomain as another domain and allow parallel download which reduce the page load time this will be useful in SERP.
Using this we have a extra copy of our themes, images, plugins on the sub domain, you can use it as the backup.
Many hosting provide gives option of the CDN, we will use WordPress functionality, you have to go to your wp-config.php file and add the below code to change the location of the wp-content directory.
define( ‘WP_CONTENT_URL’, ‘http://images.example.com/files’ );
define( ‘WP_CONTENT_DIR’, $_SERVER[‘HOME’] . ‘/images.example.com/files’ );
#13. Create the Pages that describe your brand as a person
Before beginning with the blogging or writing the post we need to create few pages that describe you. the pages will contain the information about you or about your organization.
a. About Me/Us Page:
Create this page in order to give your introduction. just provide the introduction and purpose of creating your blog/website. Even you can keep the mission, vision, values. information about the post you are going to write.
b. Contact Me/Us Page:
This is very required page that contains the information of how to reach or contact to you. this will be the entry point for others to contact you. You can add a form of Contact Form 7 plugin or Formidable or Visual Builder and add the Contact details and a map that locate you or your location.
c. Privacy Policy:
In this page you can write the legal statements or declaration like privacy policy, Security Policy, Cookies policies. If you are accepting guest post then even its policies can be added here.
d. Disclaimer:
This will having the legal notice or the term and conditions of the operation of the blog/website.
Other than this you can add services (if you are providing any like Web development, WordPress Development, SEO, SMO), portfolio (if you have done any work for others) It depends upon type of business.
#14. Important Tools
Once we are done with this setup its time to present our website to the world. for our online presence we have to create and add some meta data to get authorized. Here are few steps to be followed.
a. Create a Sitemap:
As the Bot of the search engine can not crawl themselves they need a point to start, a Sitemap helps them to crawl and index all pages and posts to them.
If you are using plugin like Yoast SEO or All in One SEO than you don’t need to worry about this. but if you are not using than you have to create using some XML sitemap generator plugin
b. Webmaster Tools(Google, Bing, Alexa):
This is required for the online presence immediately after the creation of the website. This webmaster will check for the errors, broken links, track the search history, Platforms, Keywords. You can add the Google Webmaster or Bing Webmaster, Alexa and add to the website.
Here you would have to add your sitemap and robot.txt file. Once you done with this it will automatically keep checking your website and inform you if any kind of trouble occur.
c. Google Analytics:
To track the visitors record, Location, Browser, Location etc. we need to add Google Analytics code. We have to go to Google Anlytics website. Create account with your domain and add that script to the footer of the website or the id to the respective plugins.
d. Don’t forget to create your Social media profile:
We can not under estimate the role of the social media. you need to create the profiles in Facebook, Twitter, Pintrest, Google Plus. Add their link in your website and also share your post in your social media.
#15. Add Essential/Required Plugins
There are few plugins which are necessary for every website. and other are as per your need. lest see few of them which are essential.
- Yoast SEO : this plugin is useful for the SEO and improve the Post keyword and description, generate sitemap, manage the robot.txt, .htaccess, Social presence and the Webmaster Verification without adding any code.
- Captcha by BestWebSoft : this will provide the captcha to the Login, Comments, Registration, Reset Password form. This will provide additional security from the system generated call.
- Limit Login Attempts : This will limit the login attempts so that the brute force attack can not be done on our website. this will lock access for sometime.
- Share Buttons by AddThis : This will allow the users to share it to social media. having long list of sharing it.
- Quick Page/Post Redirect Plugin : This will allow to redirect in case your page has crawl or having some old links to get redirect.
The list can be long but its requirement basis, I have covered all most every this about which Things to do after WordPress setup, but it could be possible i have forgot some. if you are facing any problem you can contact me or comment here.